Home
Home Order Forms
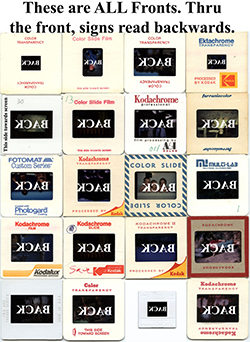
How to Tell Slide Fronts from Backs When Stacking
We’ve refined these directions since 2002 to help everyone stack slides consistently so we can scan them correctly the first time.
Quick rule: 99 times out of 100 the “blank” side of the mount is the BACK. If you’re unsure, use the method below.

Simple Step-by-Step
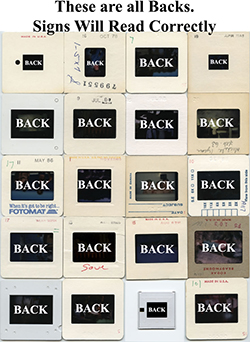
- Look through each side of the slide. When the scene reads correctly, place it on the table with that side facing UP — that’s the BACK. The FRONT faces down.
- This becomes slide #1 in your stack.
- Repeat for the rest, each on top of the previous.
- When the stack gets tall, flip it over and label the top slide (still #1) as Folder #1. Rubber band securely (use multiple bands).
- Repeat for other stacks. Rotate slides so they are all in Landscape; we will correct rotation after scanning.
- Multiple stacks for the same folder? Label #1A, #1B, #1C, etc.—all go in Folder #1.
- Viewed through the back, text (like a sign) will read correctly.
- The film on the back is a bit glossier; the front (emulsion) may look slightly duller.
- Some mounts say “This side toward screen” on the FRONT. Some plastic mounts are black on the FRONT and white on the BACK.
Slide Backs
Slide Fronts