
 Home
Home Order Forms
How to Orient Your Slides for Scanning
Proper slide orientation prevents cropping disasters and ensures your images scan correctly the first time. This guide shows you exactly how to organize your slides so they're ready for scanning—with visual examples and video tutorials to make it foolproof.
The Three-Step Orientation Process
Step 1: Determine Which Side Faces the Screen
You need to identify which side of each slide "faces towards the screen" when projected. This is the fundamental orientation that determines everything else.
Watch our video tutorial on determining front vs. back
Step 2: Stack All Slides With Screen Side Up
Arrange your stack so that all slides have the side that "faces towards the screen" facing UP. This consistent orientation is critical for proper scanning.
Step 3: Top Slide = First Slide in Each Show
The TOP slide in your stack will be the first slide in each "show" or chapter. The bottom slide will be the last in that show.
How to Identify the "Screen Side"
The 99% Rule: Most of the time, the side of the slide with the manufacturer's ID or logo faces towards the screen. If you orient all your slides this way, you'll have a 99% chance of being correct.
Some plastic slides even have "THIS SIDE TOWARDS SCREEN" stamped on the front, though it can be hard to see unless you hold the slide at an angle to the light.
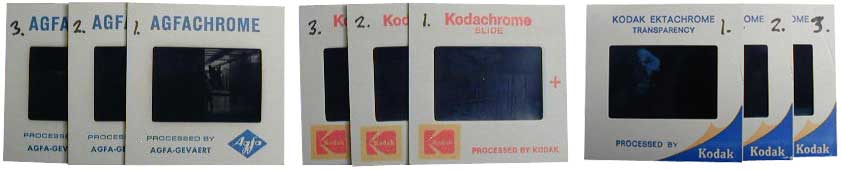
Correct stacking: All slides with screen side facing up
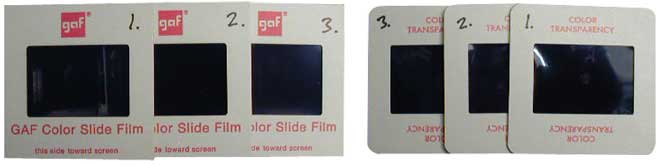
Notice how all manufacturer markings face the same direction
Video Tutorials for Different Slide Types
We've created detailed video tutorials for various slide storage formats:
Slide Orientation and Organization Movie — General slide prep
Bell and Howell Slide Cube Organizing Movie — For cube storage systems
">Waxed Paper Box Organizing Movie — For paper box storage
Carousel Preparation Movie — For carousel trays
Critical: Slide Rotation for Portrait vs. Landscape
This is where most people make mistakes that cost them money. Pay close attention to this section.
The Rotation Rule
ALL slides must be rotated to landscape position for scanning, regardless of whether the original photo was taken in portrait or landscape orientation.
Why? Our scanners have a fixed scanning area. If you send portrait-oriented slides without rotating them to landscape position, the scanner will crop off the top and bottom of your image.
What We'll Do (and What You Must Do)
We will rotate your digital images after scanning so they display correctly when you view them. But you must physically rotate all slides to landscape position before shipping them to us.
The Cost of Not Rotating Correctly
If you don't rotate your slides correctly, you have two options:
Option 1: Accept cropped images where the top and bottom are cut off
Option 2: Pay our operator $0.20 per slide (charged on ALL slides, not just the mis-rotated ones) to manually rotate them before scanning
We can't charge you only for the problem slides because we have to examine every single slide in your collection to identify which ones need rotation.
Visual Examples: Wrong Way vs. Right Way
WRONG: Inconsistent Rotation

Notice slide #3 is turned differently from the others — THIS IS WRONG
CORRECT: Consistent Rotation

All slides rotated the same direction — THIS IS CORRECT
Key principle: All slides should be oriented so that the rectangular film areas are going in the same direction throughout your stacks.
Understanding Landscape vs. Portrait Orientation
Landscape Slides
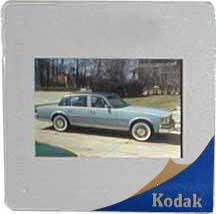
Landscape shot: Camera held horizontally
Landscape slides are already in the correct orientation for scanning. No rotation needed.
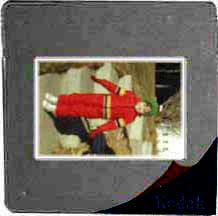
Portrait Slides
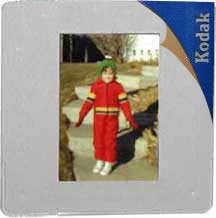
Portrait shot: Camera turned sideways to get the shot
Note: "Portrait" has nothing to do with whether a person is in the photo—it refers to the camera being turned sideways when the picture was taken.
The Scanning Area Reality

The scanner's fixed scanning area
What Happens If You Don't Rotate Portrait Slides
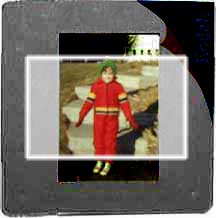
THIS is what you'll get if you DON'T rotate portrait slides correctly
Notice how the top and bottom of the image are cut off? This happens because the portrait slide doesn't fit within the scanner's landscape-oriented scanning area.
The Solution: Rotate Everything to Landscape
Landscape Slides (Already Correct)

Get all landscape slides oriented correctly → they scan perfectly
Portrait Slides (Must Be Rotated)
Rotate all portrait slides to landscape position → they scan perfectly (we'll rotate the digital image afterward)
Bottom line: Every slide in your stack should have its rectangular film area oriented the same direction, regardless of whether it's a portrait or landscape photo.
Quick Reference Checklist
Before shipping your slides:
✓ All slides have "screen side" facing UP
✓ Top slide is first in each show/chapter
✓ Bottom slide is last in each show/chapter
✓ ALL slides rotated to landscape position
✓ All rectangular film areas point the same direction
✓ Portrait photos physically rotated to landscape (we'll fix the digital orientation)
Need More Help?
If you're still unsure about orientation after reading this guide and watching our videos, don't hesitate to contact us. We'd rather answer questions before you ship than charge you $0.20 per slide to fix rotation problems after your slides arrive.
Related Preparation Guides
Storage containers and organization
More organization tips for large collections